Blog Banner

The blog banner was made with elements from Lorie Davison. The nail head is Mo Jackson, the white rabbit and the key is Tangie Baxter. The butterflies are from Katie Pertiet.

Sunday, October 31, 2010

No Craft - Just Pig

Guinea Pig Warning Alert!  
If you don't like cute Guinea Pig photos 
you'll want to return to your regularly scheduled blog list.  
We have a piggy. 
 His name is Frank.  He was named after Frank Sinatra.  
Our daughter moved out. 
 She did not take Frank with her.  
Sunday we cleaned Frank's cage.  
I took photos.  
Why? 
 Because. 
No crafts were involved. 
 Because, well, that would be...ewww....
Patiently waiting to get back into his "house."
Stealth Guinea Pig maneuvers.
Well, as stealth as a Guinea Pig could possibly be.
White hot blur!
Strategically figuring out how to get back into his house.
Can I get an awwwwwwwwww.....
from the congregation?
Frankie.  At the speed of light.
Actually, it's more like a snail's pace. 
Frank sort of lumbars.
He thinks he's speedy!
Guinea Pig.
Nose or Derriere.
You decide.
Frank contemplating the fate of universal paradoxes.
Actually, 
I think he's just wondering
where we keep the lettuce.
Frank smiling.
Can I get
an AMEN!
Happy Sunday 
and

Happy Halloween!

Saturday, October 30, 2010

I Before E - Except in Budweiser

IT'S ALL ABOUT THE ALCOHOL.
So...I'm still working on things for the upcoming craft show.  I made more necklaces and I'm not sure how thrilled I am with them.  I love little houses.  I thought these bits from Tim Holtz's Idea-Ology would make good roofs.
And they DID!

 I made
 the Love Shack.  
I have it displayed on a wine bottle. 
 Love Shack.  Wine Bottle.  Get it?? 
I just amuse the heck out of myself some days. 
 It's pretty kitschy, though.  
Hence, the naming The LURVE Shack (said with attitude)
Then I made this.
It's not right.
The jingle bell is too big.
The red and green appendage...well...it just ain't natural.
I put it away.
I got it out this morning. 
 Laughed myself silly at how ridiculous it looked.
Then I changed it up.
To this:
Smaller bells.
Smaller dangly bit.
Better.
I'm still not sure that I just love it.
My daughter says it's "almost."
Then because I have alcohol ink still out on the counter
I did this:
This was a hideous gold color. 
 It was part of a crazy pair of earrings that I somehow acquired.
I covered it in alcohol ink.
That stuff sticks to anything with a hard surface.
You can recolor anything metal.
It's great fun!
I added this piece to it.
And these pieces.
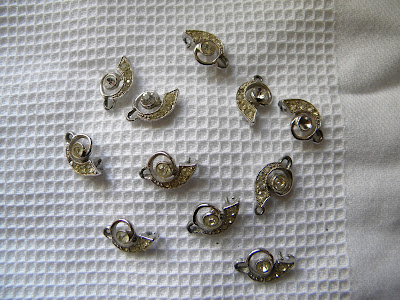
These things look like snails.
They are busted bits of jewelry.
I ended up with this:
I think it's kind of spiffy.  
The ultimate in recycling.
Or bad taste.
If I pop open that bottle of wine,
it may start to look better.


Sunday, October 24, 2010

The 12 Step Program Bow Tutorial

I'm not making fun of the 12 step program.  I just thought that it was interesting that while I was working with the pictures for this tutorial, it ended on the 12th step.  I'm not sure, but this could be a message to me from the great beyond.  Cue the loud booming voice:

"Kathy!  You need to clean your house, do laundry, and STOP with the crafts, already!!"


Ahem...  Here is my tutorial to make a really cool star bow out of vintage, yellowed, books.  Read that as: asthma inducing, inhaled dust particles creating a sinus "situation" and an altogether toxic, allergy causing substance.

To start of with, you need only 3 things.  An old book, scissors, and doublestick tape.
 Maybe a box of tissues for your nose.


STEP ONE  (You say we need to talk)
Oops. I was channeling The Frey.

STEP TWO
Cut 8 strips.  They need to be 7 inches by 3/4 inch.
Looks like the beginning of Star Wars in this shot doesn't it?
Sorry.  I digress..

STEP THREE
Fold the strips in half to find the middle.
Unfold. 
Put a piece of doublestick tape 
 on the middle of the strip where the fold was.
Turn the strip over so that the tape is on the back side.

STEP FOUR
Make a loop with the strip folding towards you to the middle.
Twist it to where the tape is on the back.
This is hard to explain in print.  
Hopefully the pictures will help.

STEP FIVE
The back side where you taped it
should look like this.

STEP SIX
Repeat with the other side of the strip.

STEP SEVEN
You should now have a piece that looks like this.

Another view.

STEP EIGHT
The back side should look like this.
You can trim the little hangy bit off if you want.

STEP NINE

Make eight of these babies.

STEP TEN


Now.  You start stacking 'em up.
Using the double stick tape layer the loops
one on top of the other. 
 Turning 180 degrees each time.
Remember, it's a Star bow.

STEP ELEVEN
Continue adding the loops.

STEP TWELVE

TA DAH!!!

These take ten minutes to make.  I can make 6 an hour.
I was thinking of selling them for  .50 a piece.
That is, until  my husband pointed out
that I'd only
be making $3.00 an hour.
My husband figured it would take me about
14,000 days to make a million dollars.
I haven't checked his math on that.
I'll get back to you 
and let you know 
how it works out.
My husband thinks he's funny...
I'll get back to you
on THAT, too.
Friday, October 22, 2010

A Break From Crafting

I went to Hobby Lobby today to pick up a few things they had on sale.  
On the way home, I took a detour as the sun was setting.
I kept heading west driving right into the sunset.
I had Bob Seger's  Roll Me Away on:

"Took a look down a westbound road,
Right away I made my choice."
The suns rays shooting up through the clouds
just about made me wreck the car.
You think texting while driving is bad?
You should try taking pictures.
It's not a good idea.
At
All.
Cute bumper sticker:
Honk if you love Jesus.
Want to meet him?
Text while driving.
Back to your regularly scheduled
crafting blog.

Just a few things I've been making.


Working on some Christmas
Old Christmas cards scanned and made into charms
for necklaces.
The backsides.
I love these two.
I added a little glittery Stickles
to the pictures.
It really makes the necklace sparkle!
Nothing says Christmas like a
1960's pink
Christmas Tree.
This, IS my favorite!

Saturday, October 16, 2010

Instant Vintage! - Grunge Tutorial 101

 I decided to dye some paper tags.  
I had a big pot of super strong instant coffee
 on the stove.
I like to boil it.  
It's not necessary, but I think it stains better if it's hot.
And here
we
go...
Get three different colors
(shades of brown)
of alcohol ink.
Put about 3-4 drops of each color
into a small plastic bag
with a zipper top.
Drop the paper tag
into the coffee mixture.
Approximately 2/3 cup of instant coffee
to 6-8 cups of water. Heat on stove.
My husband came in to the smell of what he referred to as burnt coffee.
I like to call it Cowboy Coffee.
He said, "I am not a cowboy."
Some people just don't understand 
the importance of crafts.
Remove the tag from the coffee.
Drop it into the plastic bag with dye.
I use tongs for this.
Don't leave the tag in the coffee 
too long.  The paper will dissolve.
I thought about contacting
 the tag manufacturer
and asking 
WHY the tags don't hold up
to a good cowboy coffee boil?
I figured I'd get the same look
that I did from my husband.
So I didn't.
Smoosh the tag around in the dye.
Lay them out to dry.
Preferably, all over the kitchen counter.
Thus, further confounding your husband.
I actually poured a little vanilla on top 
of the tags while they were still wet.
I thought it would make them
smell nice.  It did!
Don't even ask me
what my husband thought.

See!  They look old and decrepit now.
My husband said I should 
put them in the garage and
just back the car over them.
Hey!  That's an IDEA!
I'll be right back...
Decorate 'em up.
There you are.  
And
 they only took 
a little over 12 hours to make.