
"Kathy! You need to clean your house, do laundry, and STOP with the crafts, already!!"
Ahem... Here is my tutorial to make a really cool star bow out of vintage, yellowed, books. Read that as: asthma inducing, inhaled dust particles creating a sinus "situation" and an altogether toxic, allergy causing substance.
To start of with, you need only 3 things. An old book, scissors, and doublestick tape.
Maybe a box of tissues for your nose.
STEP ONE (You say we need to talk)
Oops. I was channeling The Frey.
Maybe a box of tissues for your nose.
STEP ONE (You say we need to talk)
Oops. I was channeling The Frey.

STEP TWO

Cut 8 strips. They need to be 7 inches by 3/4 inch.
Looks like the beginning of Star Wars in this shot doesn't it?
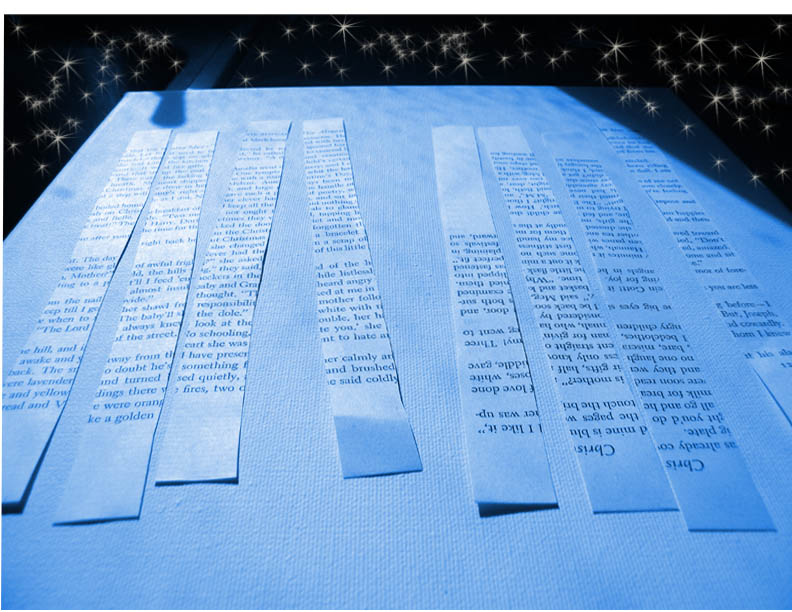
Sorry. I digress..
STEP THREE

Fold the strips in half to find the middle.
Unfold.
Put a piece of doublestick tape
on the middle of the strip where the fold was.
Turn the strip over so that the tape is on the back side.
STEP FOUR

Make a loop with the strip folding towards you to the middle.
Twist it to where the tape is on the back.
This is hard to explain in print.
Hopefully the pictures will help.
STEP FIVE

The back side where you taped it
should look like this.
STEP SIX

Repeat with the other side of the strip.
STEP SEVEN

You should now have a piece that looks like this.

Another view.
STEP EIGHT

The back side should look like this.
You can trim the little hangy bit off if you want.
STEP NINE

Make eight of these babies.
STEP TEN

Now. You start stacking 'em up.
Using the double stick tape layer the loops
one on top of the other.
Turning 180 degrees each time.
Remember, it's a Star bow.
STEP ELEVEN

Continue adding the loops.
STEP TWELVE

TA DAH!!!
These take ten minutes to make. I can make 6 an hour.
I was thinking of selling them for .50 a piece.
That is, until my husband pointed out
that I'd only
be making $3.00 an hour.
My husband figured it would take me about
14,000 days to make a million dollars.
I haven't checked his math on that.
I'll get back to you
and let you know
how it works out.
My husband thinks he's funny...
I'll get back to you
on THAT, too.
23 comments:
LOL! SO cute. Both the bow AND the commentary. Thanks so much for the tutorial, Kathy. I think this is so clever.
XO,
Sheila :-)
Leave it to an accountant to pee on your parade!!!! LOL!!! Love your tut!!! Hugs, Terri xoxoxo
Love it! Get to work on that million, we will be wanting an update!
Love your bow tutorial and thank you for sharing. Isn't crafting all about taking tons of time to make next to zero money?!! Happy creating...
These are now on my to-do list -- much of which I hope to accomplish in the next 14 days because my helpful husband is out of town and I can spread out my mess all over the place! woo-hoo
Brilliant!
Sandra Evertson
At the rate I'm going selling my crafts....I would be happy with $3.00 an hour. Haha
How utterly awesome! I'd love to share this post on my blog and link back to you with permission to use the finished bow photo. Great idea!!!
Hi Kathy! Thanks for stopping by Robin's Egg Blues! And I love your book page bow! Genius!
I'm going to make some of these with vintage sheet music pages! Bless you girl!
Linda
What a cool idea....thanks for sharing the tutorial! Have a great week!!
Hugs,
Robin
Thanks for the great idea.
Thanks for the tutorial, I really like the look of the bow and I will make some of them for Christmas.
It is so comforting to know I am not alone.........
OK - 14,000 days...and a husband that thinks he's funny j/b he can multiply? LOL It amazes me how profound those peeps in the peanut gallery seem to think they are. It's also just so much fun to read your posts because I LOVE your sense of humor Kathy. These look like they could be made while you watch a TV program which is $3.00 per hour than you'd be making otherwise? I have to try them! Thanks for the tutorial.
s/b MORE than above. And the star wars comment - LOLOLOL no kidding....it also reminded me of that one with that big black 'marble' slab of something that came out of space...2001 A Space Oddessey? Remember?
Just found your blog via Amy at Into Vintage - it takes a lot to make me laugh out loud (and subscribe to yet another blog) - but the Star Wars photo? I'm in.
It is absolutely delightful!!!
Hugs,
Margaret B
I love this I have to figure out how to file it somewhere......I can't wait to try these!!!!!
Love it. And will absolutely be trying these. Thanks for the tutorial!
I arrived by way of Tales of an OC Cottage - love the tutorial! Thank you!
These are too cute! Thanks for sharing.
Blessings~
Yes!!! This is the best thing ever. I hate re-buying bows and I can't stand the flimsy cheap ones. What a great way to recycle paper and ribbon. I'd like to link this to my blog later today it it's okay with you.
http://theyearoflivingfabulously.blogspot.com/
Thanks for the tutorial. I like it!! The ar beautiful.Maybe you want to take a loke on my blog?
Dear greatings, Elly
Post a Comment